
Leyla opens order #42 and presses "Pay". What should your server do? Not accept the card (we saw why in lesson 038), but create a Checkout Session at Stripe and send the customer to a ready-made payment page. In this lesson we connect Stripe to the shop from the events project: we prepare the keys, describe the product and the price, create the session, learn not to trust the price from the client, and see why the "Thank you" page proves nothing.
How Checkout works
Stripe Checkout is a ready-made payment page hosted by Stripe: it accepts cards and other payment methods, shows 3-D Secure by itself, is translated into the buyers' languages and works well on a phone. All that is left for you is to create a Checkout Session — an object that describes what the customer pays for (items, amount, currency, return addresses) — and to send the customer to session.url.
An analogy: a waiter (your server) writes the bill and leads the guest to Stripe's cash desk. The guest pays and comes back with a receipt in hand, but a receipt in the guest's hand does not yet mean that the money arrived.
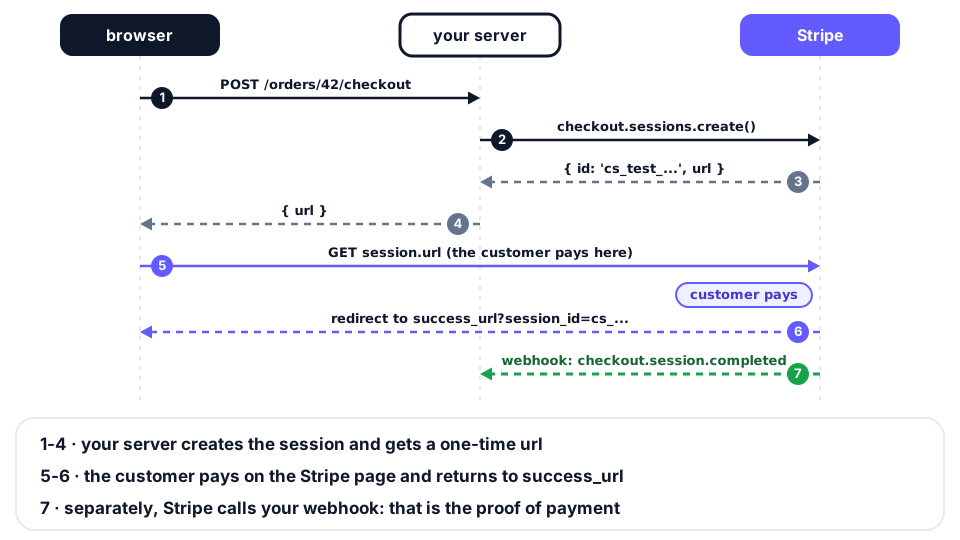
Steps 1–4: the button calls your route, the server creates a session at Stripe and gets a url. Steps 5–6: the browser goes to the Stripe page, the customer pays, and Stripe returns them to success_url. Step 7 runs separately from the browser: Stripe calls your webhook (lesson 040).
Keys and setup
In the Dashboard (the sandbox) open Developers → API keys. There are two keys: the publishable pk_test_… (it is safe to show in the browser; a redirect to Checkout does not need it) and the secret sk_test_… (for the server only). In production Stripe recommends restricted keys rk_… with minimal permissions. Save the key in .env:
# .env  (never commit this file)
STRIPE_SECRET_KEY=sk_test_51...
APP_URL=http://localhost:3000
Install the SDK with npm install stripe (Node.js 20+ is required). Since version 22 Stripe is a class, and the object is created only with new:
// src/stripe.js
import Stripe from 'stripe';

export const stripe = new Stripe(process.env.STRIPE_SECRET_KEY);
Products and Prices
In Stripe a thing you sell is described by two objects. A Product is what you sell (a name, a description, an image). A Price is how much and how often: an amount in the smallest units, a currency, a one-time or recurring payment. One product can have several prices. A price is not edited: for a new amount you create a new price and archive the old one, because the old one stays as a record of past payments.
You can create them in the Dashboard (the Product catalog section) or through the API:
// scripts/create-price.js  (run once)
import { stripe } from '../src/stripe.js';

const product = await stripe.products.create({ name: 'Node.js Handbook' });

await stripe.prices.create({
  product: product.id,
  currency: 'azn',
  unit_amount: 2500, // 25.00 AZN in minor units
});