
The notifications service of our shop has to send emails: "order paid", "goods shipped". There are many of them, sending is slow, and we cannot afford to lose any. In the previous lesson we saw that this kind of work needs a message broker. Today we will start RabbitMQ, write the first sender (producer) and receiver (consumer) in Node.js and see how the broker keeps messages safe when a worker crashes.
What RabbitMQ is
RabbitMQ is one of the most popular open-source message brokers. It is written in Erlang, runs as a separate server and talks to applications over the AMQP 0-9-1 protocol (it supports others too, for example MQTT). There are client libraries for every popular language, so services in Node.js, Python and Java can exchange messages through one broker. In Node.js we will use the amqplib library.
The AMQP model: five parts
Think of the post office: you drop a letter into a box, a sorting centre decides where it goes, and a postman delivers it to the addressee. AMQP is built the same way:
- Producer is the application that publishes messages.
- Exchange is the "sorting centre": it accepts a message and decides which queues to put it into. It does not store messages itself.
- Binding is a rule "exchange → queue" with a binding key.
- Queue stores messages until somebody takes them.
- Consumer is the application that takes messages from a queue and processes them.
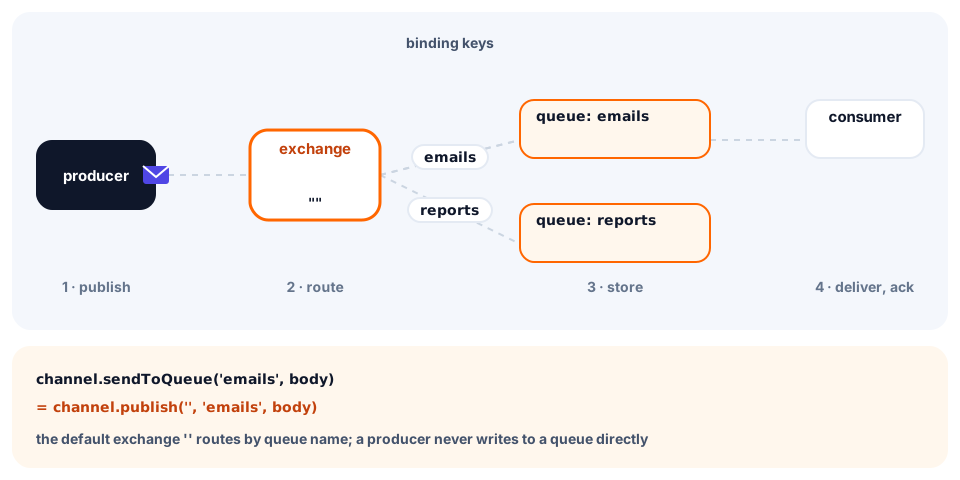
Important: a producer never writes to a queue directly, only to an exchange. But RabbitMQ has a nameless default exchange (its name is an empty string): every queue is automatically bound to it under its own name. That is why channel.sendToQueue('emails', body) is a shortcut for channel.publish('', 'emails', body). We will cover the other exchange types in the next lesson.
Running RabbitMQ in Docker
You have already started PostgreSQL and Redis with Docker Compose, and RabbitMQ starts the same way. You need the image with the management suffix: it includes a web interface.
services:
  rabbitmq:
    image: rabbitmq:4-management
    hostname: rabbitmq
    ports:
      - "5672:5672"     # AMQP: applications connect here
      - "15672:15672"   # management UI in the browser
    volumes:
      - rabbitmq-data:/var/lib/rabbitmq

volumes:
  rabbitmq-data:
Port 5672 is for applications (AMQP), port 15672 is for the web interface. The hostname is set on purpose: RabbitMQ stores its data under a node name taken from the host name, and without a fixed name the old data will not be found after the container is recreated. Let's start the broker and install the client library:
docker compose up -d
npm install amqplib
Open http://localhost:15672 and log in as guest / guest: the interface shows an empty broker. The RabbitMQ image allows this user to connect from outside the container, so our scripts can use amqp://localhost too.
